
Linked List
Create relations between lists, displaying all related information in one place, as well as aggregate and retrieve data between lists through this connection.
Creating a linked list field
- Under any list click on fields
- Click + Create New Field
- Type a field name
- From “Field Type” Drop Down List select “Linked List”
- Next you will select the List you’d like to connect to the current list
- When you select linked list the list drop down will automatically open
- You will find the lists under the same app first
- If the list you’d like to select is under a different app you need to scroll down past the lists to see the rest of the apps
- Select the App under which the List you want to connect is
- Select the list
- You’re good to go!
Options
Pin
- You can easily pin Linked List fields by clicking on this icon
- Now they will always appear at the top of the Right Panel
View Filter
- You can add a View filter to the linked list field
- This will mean that only records that matches the filter criteria can be linked to the current list
- To do this you need to:
- Create a view under the Linked List
- Apply the filter you’d reflected to the linked list field
- Then go back to the list where your linked list field is and select the view that you created from the view drop down.
Use Case
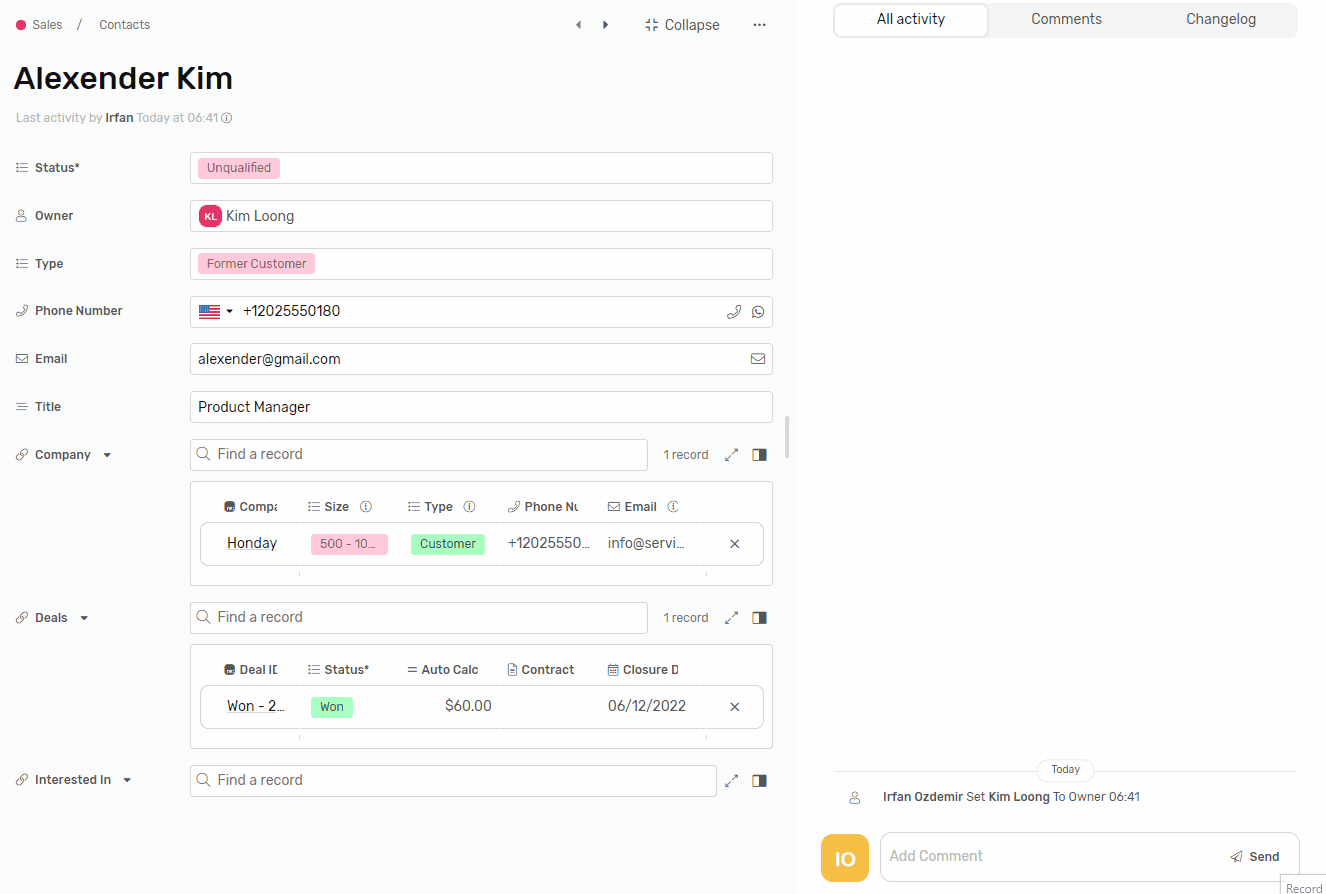
- Install Workiom CRM Module
- Under The “Sales” App
- Go to the ”Company” list
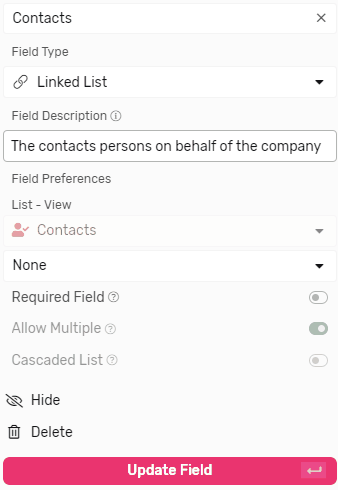
- Then go to “Contacts” Linked List Field you will notice the following:
- The field has “Verified” as it’s view filter
- This means that you can only link Leads that matches the filter under the Qualified view, which is
Verified = True - This will make it easy to sift through contacts and only reach the ones that have already been verified.
Allow Multiple
- Toggling this option will allow you to link multiple records from the other list to the list you’re currently on through this field.
Use Case
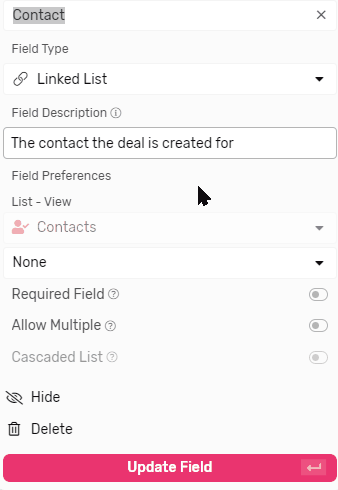
- Install Workiom CRM Module
- Under The “Sales” App
- Go to the ”Company” list
- Then go to “Contacts” Linked List Field you will notice the following:
- The field has “Allow Multiple” Enabled
- This means that you can link more than one contact to the same Company, which helps keep track of all stakeholders on the prospect’s side.
- You can add contacts by simply clicking the fields and start picking related contacts.
- You can start typing the contact name in the search bar to narrow down the results.
Cascade
- Let’s take a few examples of cascading to get a better idea of what can be achieved with this feature
- Roles are cascaded from Departments
- If I select Marketing as a department I can select Marketing Manager, Content Writer or Social Media Manager as a Role under Marketing.
- If I Select Finance as a department I can select CFO, Compensation Specialist, or Accountant as a Role under Finance.
- Cities are Cascaded from Countries
- If I select Australia as a Country I can select Sydney or Melbourne under Australia.
- If I Select England as a Country I can select London or Liverpool under England.
Creating a Cascaded List
- Install the CRM module
- Let’s create a Country -> City example together and use it under the Sales app
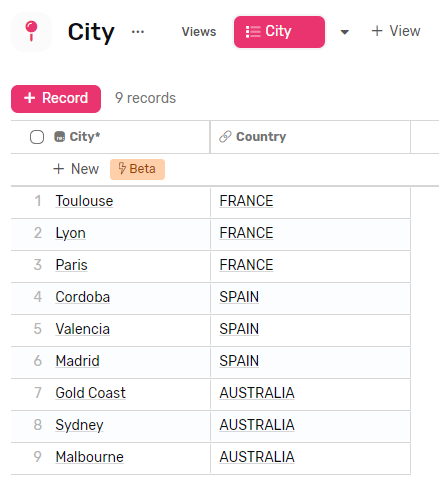
- We will use the following table in the example
| Country | Cities |
| Australia | Malbourne |
| Sydney | |
| Gold Coast | |
| Spain | Madrid |
| Valencia | |
| Cordoba | |
| France | Paris |
| Lyon | |
| Toulouse |
- You already have a list, named Countries we can use it for this example
- Create a new list, name it City
- Under this list create a field Type linked List, name it Country
- Look for the list Country and Link It
- Click “New Field” to create the field, now the 2 lists are linked
- Now create a record for each of the 9 cities we have in the table above
- While creating the record enter the City in name in the “Name” Field, and select the related country in the “Country Field”
- Your table should look like this when done
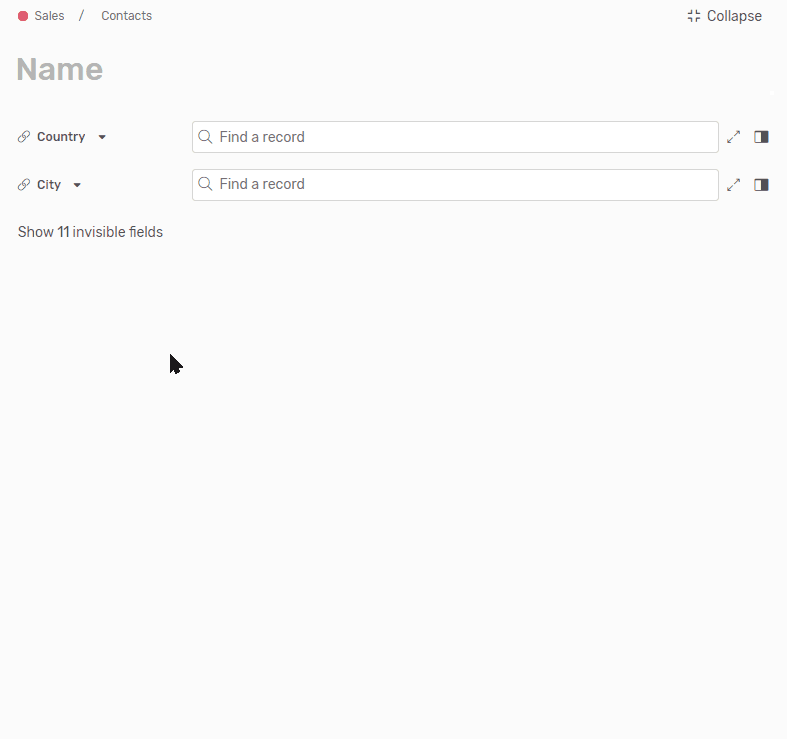
- Now go to the Contacts List
- Create a Linked List Field,
- Name it Country
- Link it to the Country List
- Click “New Field”
- Create a second Linked List Field
- Name it City
- Link it to the City
- Toggle “Cascaded List” Option
- Choose “Country” field from the dropdown list to cascade the city from
- Click “New Field”
- Now you have the City Field Cascaded from Country.
- Let’s put this to the test now
- Create a new record under the Contacts List
- Go to Country Field, and Select Australia
- Now go to City, you will notice that you only have the options related to Australia in the City Field.
- If you change the country to Spain, you will only have Cities related to Spain in the City field.
Linked List Association
When you create a linked list field you can choose whether to have a field automatically created on the list you linked through the field.
The option is disabled by default to avoid the creation of unnecessary fields and thus keeping a clean dataset, you toggle it on from the “Has Associated Field” option under the Field’s options.
You can also remove the existing association between fields if you don’t need it, which will give you the benefit of:
- A cleaner list, with no unnecessary fields here and there.
- Faster processing time for your automations since they have to deal with less connections.
Example:
If you have your “Leads” linked to the “Country” list, then you most likely need to see which lead is under which country on the lead list, and the “Country” list is just used as a list of options.
Here’s what you can do to remove the unnecessary field on your Country list:
- Go to “Leads” list
- Go to the “Country” field
- Open the field’s menu
- Toggle “Has Associated Field” off.
Linked List Field In Email
Linked list can be displayed in 2 different ways in email, let’s take the following example
- Linked List Field name “Products”
- The Field is linked to 3 records, (“High Chair”,”Meeting Room Table”,”Monitor Riser”)
- in the email body you can select 1 of 2 options:
- {{Products}}: and this will appear in the email asHigh Chair, Meeting Room Table, Monitor Riser
- {{Products (Table)}}: and this will print a table with the record fields
Linked List as a table
When linked list is printed in the email as a table it will follow the following rules:
- It will print the main view of the linked list as a table.
- It will print the fields in the same order in the main view.
- It will only print the fields that are shown in the main view.
Append Option
Under the update record action in automation you can choose whether to append or replace, appending and replacing follows the rules below:
- Linked List with Allow Multiple has now 2 option when mapping
- Append ( Default )
- Append means that the new linked record will be added without removing the existing linked records
- Append will be toggled on by default for all newly created automations
- Replace
- At the end of the replace operation only the last linked record will remain in the field and it will overwrite whatever was stored before it.
- If the field is single (Allow multiple is toggled off), only replace option will be available.
